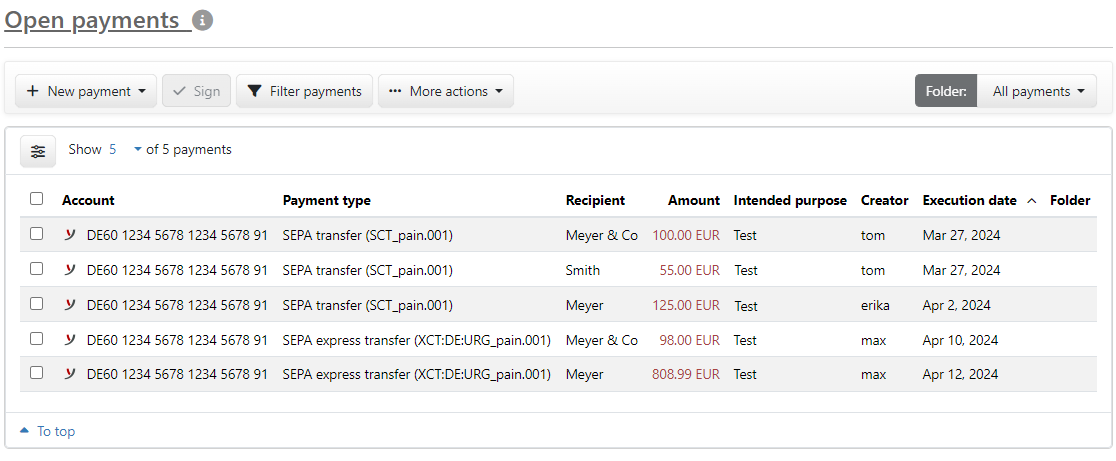
Figure: Overview of the open payments
The page Open payments or Payments depending on the pre-configuration of the application can be opened via the menu Payments and by default also via Quick access from the Home page.
After you have entered a payment, it is initially on hand as an open payment. The same applies, when an external payment file was imported and also for payments that were not created by you, but by other users of the application. Accordingly, in the overview on this page you will see all payments that have not yet been signed and thus have not yet been submitted to the bank.
You can create folders to have better clarity in case you have a large number of payments. To do this, there is a button on the right above the overview, which lets you create new folders and switch between them. If you are inside a folder, you can rename or delete it. If there are still payments in a folder and you want to delete it, you will be informed that the payments will also be deleted. If you have created folders and selected the item All payments, there will be an additional column in the overview which shows the folder where a payment is stored.
To record a new payment, click the button New Payment. This will expand a menu, from which you can choose those payment types for which you have been granted permission by the bank. Then a new page with a form will be loaded, where you can enter the data for the payment, e.g. SEPA transfer.
The Sign button is activated as soon as at least one payment is selected in the overview. If several payments are marked and then signed, they are sent to the bank as a single order, unless the payment type or the bank of the originator is different. Furthermore, the number of marked payments is displayed in the button. By clicking on the button, the page Sign order is called up. If a selected payment has an execution date in the past, a dialog box opens first, where you can correct this.
Clicking on Filter payments opens a dialog box, where you can select or enter values in several fields, by which the overview is filtered. After a click on Submit, the dialog box closes and the overview is displayed filtered. This is also indicated with a yellow bar. Click the button again to deactivate the filter. A further click opens the dialog box with the previously entered values, which can be changed there or deleted by clicking Reset.
By clicking on More actions, a menu with additional items will be expanded. The most actions are only activated if payments are selected.
By clicking on this menu item, the page Import payment is called up.
The menu item Save is used to download a payment to your computer as a file in its original format. If you have selected several payments of the same type, they will be saved as a single file.
With Delete you can delete one or more payments. This process must be confirmed in a dialog box.
This menu item creates copies of the selected payments.
If you have created a folder, you can use this menu item to move the marked payments to it.
With Modify payments you can edit several fields of payments at the same time. For this purpose, a dialog box appears with the fields that can be changed. This function is useful, for example, if you have saved signed payments as open payments and then want to change the execution date and the intended purpose for all of them together.
The next two menu items are only activated if exactly one payment is selected in the overview. If you click on Save as periodic payment, a page will be opened for entering a payment that is filled in with the values of the payment marked here. You will find a description of this in the section Periodic payments - Record payment. The menu item Save as payment template opens a dialog box, where you can enter the name for the payment template.
This saves the details of the selected payments locally as a PDF file.
With these menu items you can download an overview of the marked payments as a PDF or CSV file to your computer. If no line in the overview is selected, the file contains all payments.

Figure: Overview of the open payments